It was 70 degrees today! Spring has been slipping in and out of my life for the last couple of weeks, but I think it is ready to stay awhile.
I do enjoy the cold months because I love any excuse to drink hot chocolate and watch a movie in sweat pants (and the sun just makes you feel so guilty if you try to do that in the summer), but I am embracing spring more than I typically do because I have a very bored almost-one-year-old to entertain.
We've been going on walks almost every day which is great for his napping and even better for my thighs, who are just about ready to pull out the swimwear.
Which brings me to the recipe for today. What could be better for your swimsuit body then a wide variety of salads? Okay, salads don't really NEED a recipe but I made the poppy seed dressing from scratch, and it was delicious and so easy. Plus it looked really pretty to me, so I had to take a picture of it and fit it in somehow. I actually took this to a church activity and all the ladies loved it and didn't leave any leftovers.
So here's the recipe:
Salad
1 large romaine lettuce head, torn
3/4 cup craisens
2 sliced gala apples
1 Tablespoon lemon juice
1/2 cup glazed walnuts
1 cup poppy seed dressing
Poppy Seed Dressing
3/4 cup mayonnaise (low fat works if you're into that)
1/3 cup sugar
1 Tablespoon apple cider vinegar
1 Tablespoon poppy seeds
Combine all dressing ingredients in a small bowl and stir until no lumps remain. Set aside. Slice apples and sprinkle with lemon juice to preserve color. Combine all ingredients in a large bowl. Pour dressing in salad bowl, toss, and serve immediately.
Showing posts with label apple. Show all posts
Wednesday, April 9, 2014
Wednesday, October 16, 2013
Apple Cider
Oh Utah fall, how my Washington heart loves you! To many people, Utah has a great climate. It's hot in the summer and pretty much beautiful everyday if you want to plan ahead for a barbecue or an outdoor wedding. The winter produces fresh snow almost daily for all the skiers and snowboarders. It is the perfect weather for the person who loves to do outdoor activities.
However, I am not a person like that. I wouldn't say that I'm not "fun", but maybe I'm not the typical kind of fun that most people think of. I love sweats and books and cuddles with my little baby. And I love warm comfort foods and drinks. But I don't like to be restricted indoors either and I'm not a huge fan of snow. So this is why fall is my favorite.
It's cold enough that it brings people closer together to get cozy. It also allows you to reasonably wear sweats to keep warm as well as to hide that extra layer of winter chub. The leaves are changing and the rare desert rainy days are not so rare.
If Utah was fall all year round then I might love it as much as my Pacific Northwest home. Unfortunately, it doesn't last that long, so Utah fall will remain a seasonal dessert that I can look forward to while I cope with the other extreme temperatures.
So enough of my brain skimmings. Here's the point: I made homemade cider.
It was really easy! And the result was a house that smelled like an orchard and a quart sized jar of cider swirling with spices. Here's the recipe:
Apple Cider
(makes one quart)
6 apples (it is best to have a variety of sweet and tart)
1 orange (optional)
1/2 cup sugar
3 Tablespoons lemon juice (less if you have an orange)
1 Tablespoon cinnamon, or two cinnamon sticks
1/2 teaspoon cloves
1 pinch of nutmeg
enough water to cover
Slice apples and oranges and put them into a thick bottomed pot that has a lid. You don't have to worry about peeling or coring the fruit since you will be straining the mixture later. Add the sugar, lemon juice, and spices to the pot. Pour enough water to cover the fruit. The apples will float, so just remember where the water would have covered the fruit. You want to add enough water to maintain a good boil for an extended amount of time, but not so much that your cider turns out diluted.
Heat the mixture on the stove until it reaches a rolling boil. Allow it to boil for 30 minutes uncovered. Stir and mash the fruit as it becomes softer. Cover the pot and lower the temperature so it is a little more than a simmer. Stir and mash fruit occasionally and boil for 4 to 5 hours.
Remove from the heat and mash the fruit again. Strain through a cheesecloth, a handkerchief, or pantyhose. Taste and add more spices, sugar, or lemon juice as needed.
Enjoy!
Lisa
However, I am not a person like that. I wouldn't say that I'm not "fun", but maybe I'm not the typical kind of fun that most people think of. I love sweats and books and cuddles with my little baby. And I love warm comfort foods and drinks. But I don't like to be restricted indoors either and I'm not a huge fan of snow. So this is why fall is my favorite.
It's cold enough that it brings people closer together to get cozy. It also allows you to reasonably wear sweats to keep warm as well as to hide that extra layer of winter chub. The leaves are changing and the rare desert rainy days are not so rare.
If Utah was fall all year round then I might love it as much as my Pacific Northwest home. Unfortunately, it doesn't last that long, so Utah fall will remain a seasonal dessert that I can look forward to while I cope with the other extreme temperatures.
So enough of my brain skimmings. Here's the point: I made homemade cider.
It was really easy! And the result was a house that smelled like an orchard and a quart sized jar of cider swirling with spices. Here's the recipe:
Apple Cider
(makes one quart)
6 apples (it is best to have a variety of sweet and tart)
1 orange (optional)
1/2 cup sugar
3 Tablespoons lemon juice (less if you have an orange)
1 Tablespoon cinnamon, or two cinnamon sticks
1/2 teaspoon cloves
1 pinch of nutmeg
enough water to cover
Slice apples and oranges and put them into a thick bottomed pot that has a lid. You don't have to worry about peeling or coring the fruit since you will be straining the mixture later. Add the sugar, lemon juice, and spices to the pot. Pour enough water to cover the fruit. The apples will float, so just remember where the water would have covered the fruit. You want to add enough water to maintain a good boil for an extended amount of time, but not so much that your cider turns out diluted.
Heat the mixture on the stove until it reaches a rolling boil. Allow it to boil for 30 minutes uncovered. Stir and mash the fruit as it becomes softer. Cover the pot and lower the temperature so it is a little more than a simmer. Stir and mash fruit occasionally and boil for 4 to 5 hours.
Remove from the heat and mash the fruit again. Strain through a cheesecloth, a handkerchief, or pantyhose. Taste and add more spices, sugar, or lemon juice as needed.
Enjoy!
Lisa
Wednesday, October 2, 2013
Fall Sauce
Right now I am re-reading Anne of Green Gables for probably my fifth time. Whenever I read this book, I seem to enjoy the seasons so much more. This time around my appreciation for nature and the changing seasons seems to be amplified. Maybe it's because I'm a new mom and I am constantly aware that I'm in the presence of a human that is experiencing everything for the first time. Or maybe it's because I am reading this book during the season where the mountains surrounding my house seem to be on fire with the changing leaves.
Whatever it is, autumn has hit me hard this year and I feel like I may never recover.
I am constantly dreaming of new concoctions that I could make with apples or pumpkin. Nutmeg and cloves call out to me from their shelf tucked away. So when I acquired an assortment of apples, pears, and peaches from my mom and grandma, I mentally drooled over the possibilities.
I was originally going to try to make homemade cider, but I didn't have any cheesecloth, and since the day was an I-may-never-get-out-of-my-sweats kind of a day, I decided to stay homebound and find something else equally blog-worthy.
With some prodding from my mom, I decided to make fall sauce. I can't exactly call it applesauce since it was an assortment of fruit, but it's the same basic idea. This was the best idea ever, because not only do I have a husband who loves applesauce, but I have a growing baby who will be able to eat this starter food soon. Who wouldn't want to save the money that they would have spent on baby food?
This recipe was pretty dang easy and it made my house smell magical.
Fall-Sauce
10 medium apples (an assortment will add more layers to your sauce, but I just used Gala)
6 medium pears
2 large peaches
3 teaspoons lemon juice
1/2 cup brown sugar
2 tablespoons cinnamon
dash of cloves
dash of nutmeg
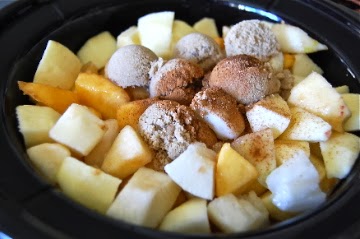
Wash, peel, and core all the fruit. Cut it into slices and place in a deep crock pot. Sprinkle the lemon juice over the fruit to keep it from browning. Mix regularly while cutting the fruit. Add the sugar and spices and set the crock pot on low for 6 hours. Stir every hour. After it's done, blend the fruit mixture with an emersion blender until desired consistency. This made a little more that 2 quart sized bottles.
You can continue on to can your sauce in a canner, but I just decided to freeze my extra bottle. Your refrigerated bottles will last up to 3 weeks.
This sauce turned out to be pretty yummy, if I say so myself. The mixture of fruit and spices really added depth to the sauce. It combined all the sweet, tart, and spicy tastes really well. It's mild enough to give to a baby, but not bland at all so an adult would enjoy it too.
This is a great way to take advantage of the fall apples and end of summer peaches!
Enjoy!
Lisa
Wednesday, September 25, 2013
Single Serving Pies
I'm not a cold cuts kind of girl. I've always hated packed lunches from the time I started kindergarten to the end of my college career. Unfortunately my husband is exactly the same. He'll eat whatever I make him, but it is not very satisfying to make someone a lunch you know they won't enjoy.
Enter: single serving pies.
If there is one dessert my husband loves, it's apple pie. So these on-the-go pies are perfect for his lunches. You will need the half pint, wide mouth, short Mason jars for this recipe. It is important that you get the ones with the straight sides so they are easier to fill and eat.
You can use any pie crust recipe that you love, but here is one that is perfect every time. This recipe has been passed down at least three generations, if not more, and it produces a flaky, delicious crust that I dare you to try and beat.
Mom's Flakey Crust
(makes one standard size 2-crust pie)
2 cups flour
1 tsp salt
3/4 cup shortening
5 Tbs cold water
Combine the flour and salt. With a pastry cutter, incorporate the shortening into the dry ingredients until crumbly. Once all the flour and shortening are incorporated, add the cold water one tablespoon at a time. Mix lightly with a fork between each tablespoon. Do not overwork. Gather the crust into a ball and roll out on a floured surface.
For these pies, you can cut out the tops of the crust with the lid of the mason jar or you can use the crumble top recipe.
Crumble Topping
(makes about 6 single-serving pies)
1/4 cup brown sugar
1/4 cup flour
1 teaspoon cinnamon
4 tablespoons cold butter
3 tablespoons of oats
Stir sugar, flour, and cinnamon together. Cut butter in with a fork or a pastry blender until incorporated. Add oats and mix together. Add two to three tablespoons of mixture to each pie top.
Apple Pie Filling
(makes 4 to 5 single serving pies)
2 to 2 1/2 cups of sliced and peeled apples
1 tablespoon lemon juice
2 tablespoons sugar
2 tablespoons flour
1/2 teaspoon cinnamon
1 pinch of nutmeg
1 pinch of cloves
1 tablespoon of butter chopped into 4 to 5 pieces
Add all ingredients except the butter in a bowl and stir. Coat evenly. Fill each crust with a little space remaining at the top. Add the pat of butter. Top with the top layer of crust or the crumble topping. Make sure to poke holes in the top layer of crust for vents if you aren't using the crumble topping.
Heat oven to 375 degrees and bake pies for 45 minutes or until the tops are browned.
You can eat these right away and use the baking instructions above, but I doubled the recipe and saved a lot to freeze. Don't cook the pie first if you are going to freeze it; just assemble it in the jar and screw the lid on tight!
To bake after freezing, heat the oven to 375 degrees. Place the jar on a cookie sheet and remove the lid. Bake for 50 to 60 minutes or until the top is browned. So if you are packing this in your lunch, bake it far enough in advance that it is cool enough to travel in your lunch box. You can then eat it at room temperature or give it a little zap in the microwave before eating.
This idea is also great for really any kind of pie, so the sky is the limit. Be creative and enjoy!
Lisa
Labels:
apple,
crumble top,
crust,
dessert,
easy,
Food,
lunch,
on-the-go,
pie,
recipes,
single serving
Subscribe to:
Posts (Atom)